In the digital realm, establishing a strong online presence is paramount. For many developers and content creators, GitHub Pages offers an incredibly convenient and cost-effective solution for hosting static websites. It's free, integrates seamlessly with Git for version control, and provides a straightforward way to publish web content directly from your repositories.
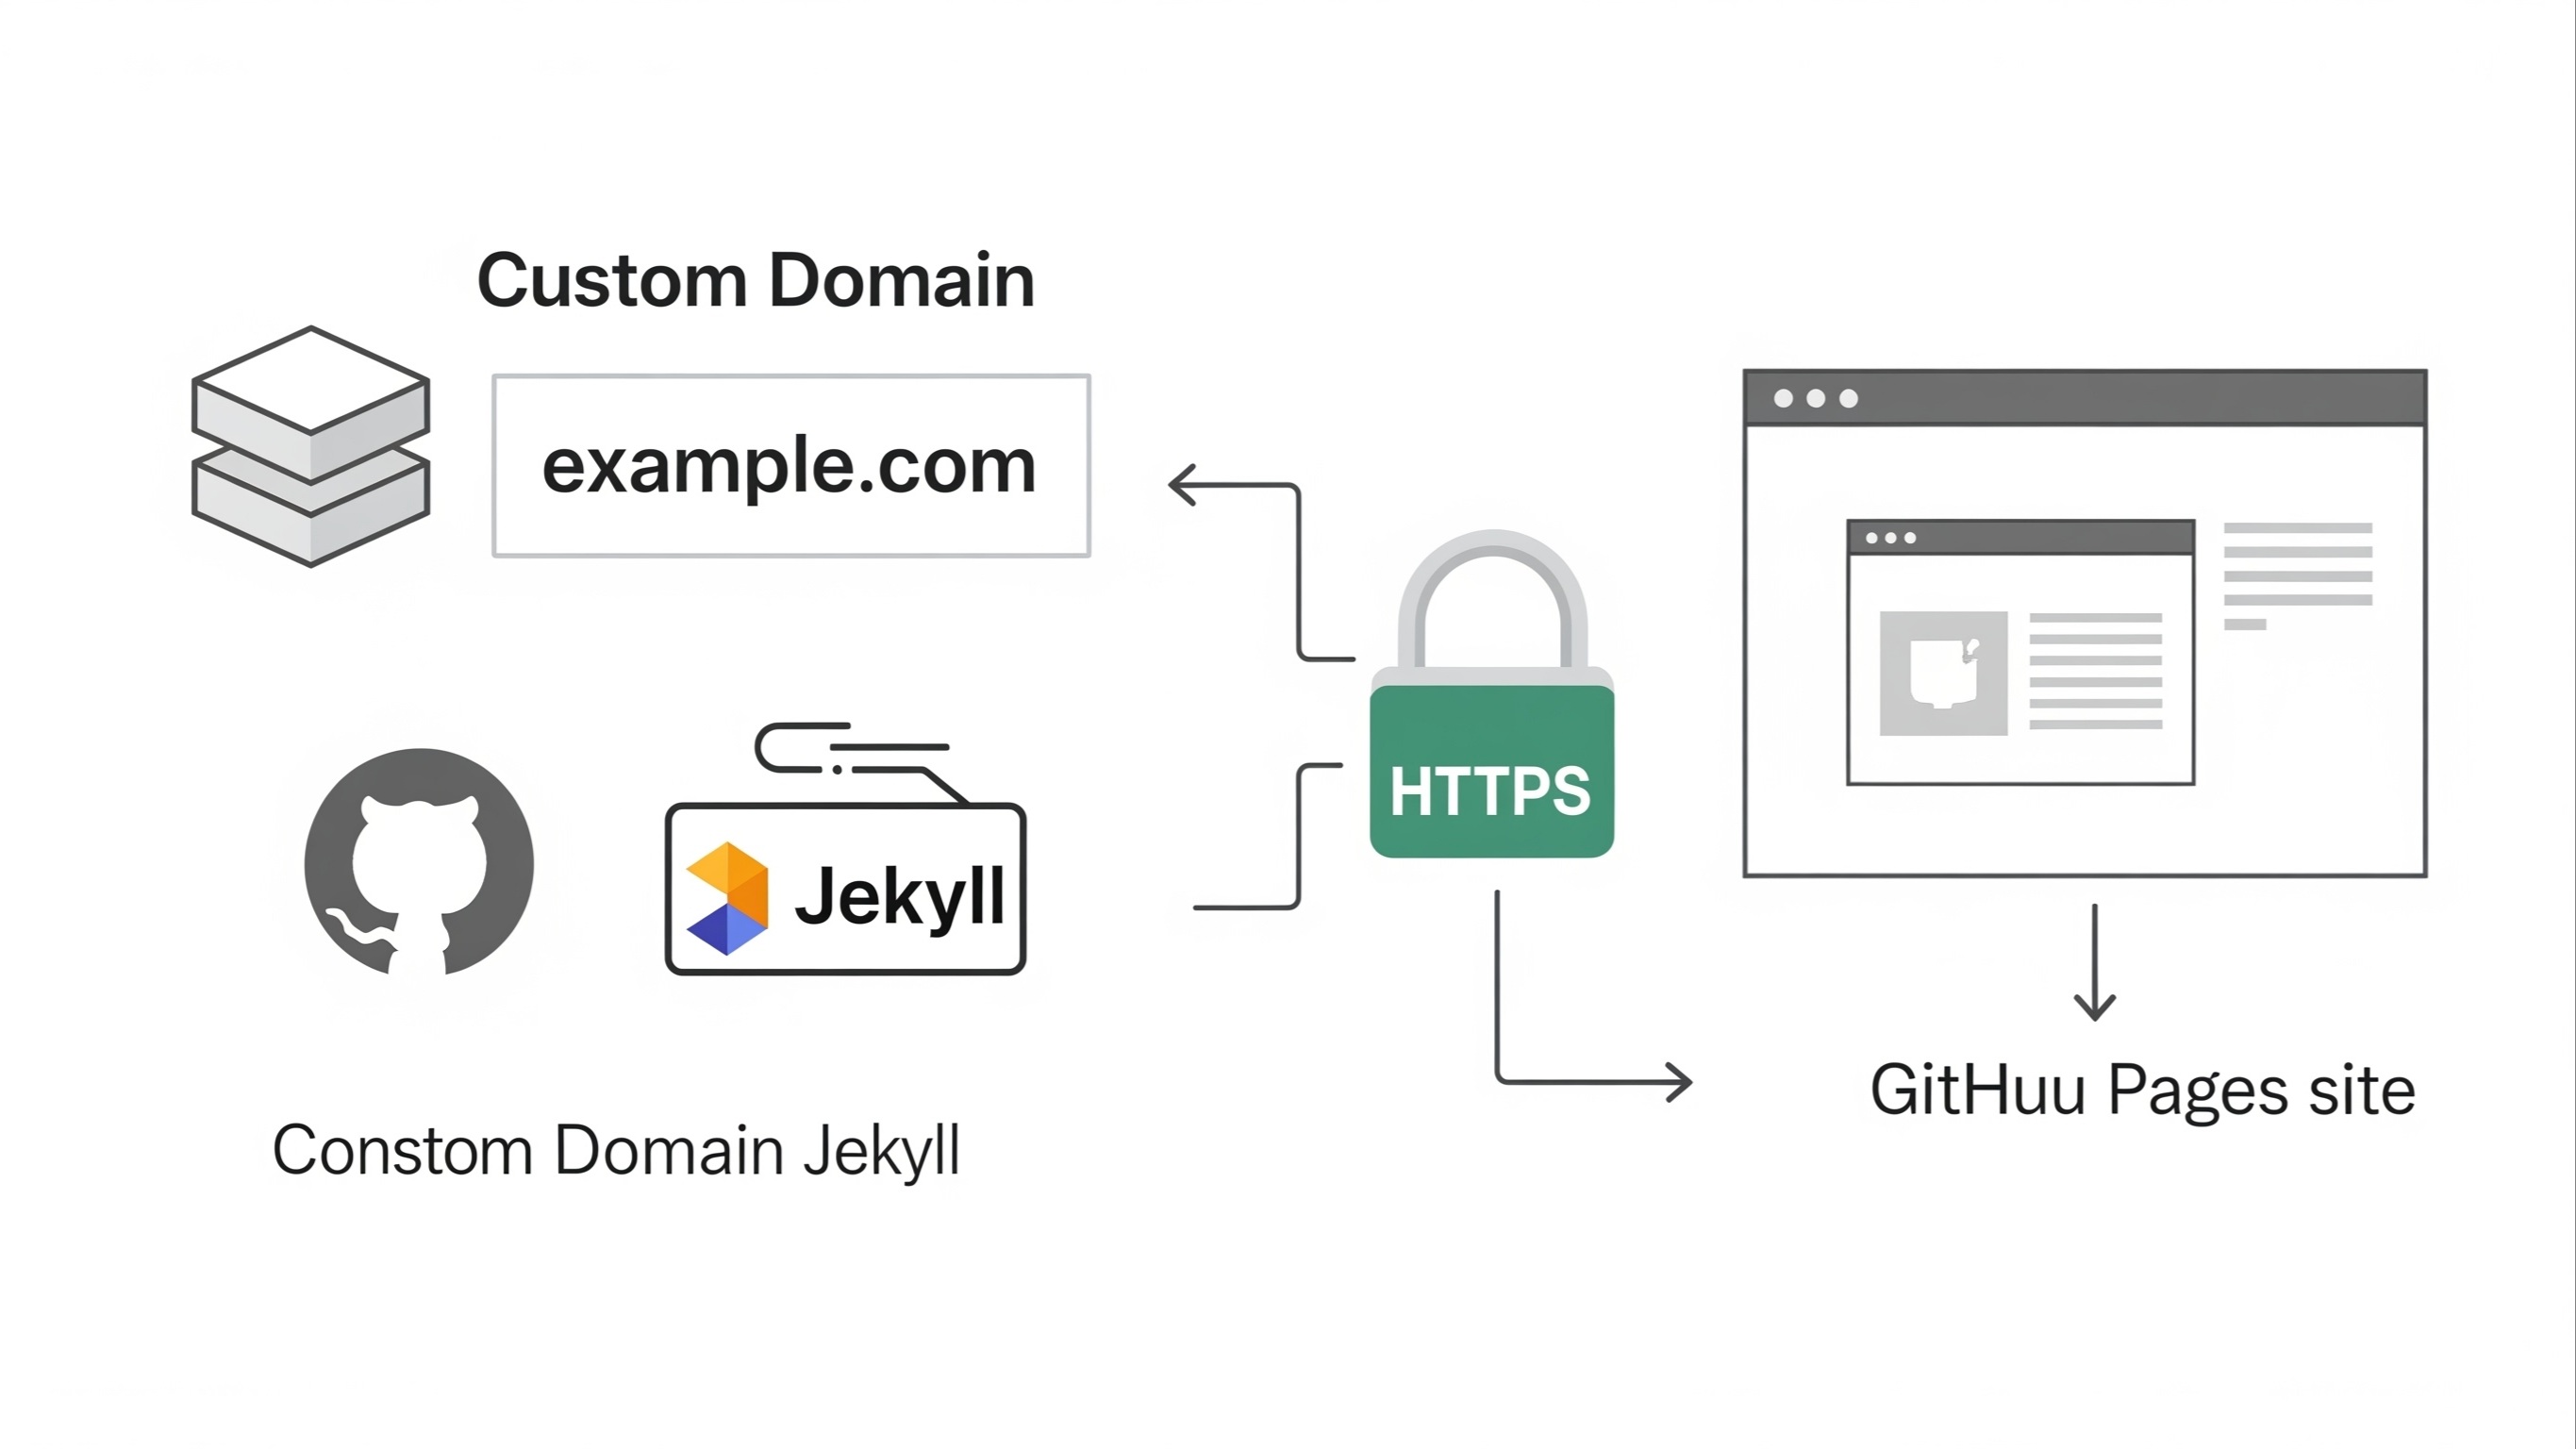
While the default username.github.io URL is functional, a custom domain lends an air of professionalism and brand identity. Imagine sharing yourbrand.com instead of a generic GitHub URL – it’s more memorable, trustworthy, and impactful. Furthermore, in today's internet landscape, HTTPS (Hypertext Transfer Protocol Secure) is no longer an option but a necessity. It encrypts communication between your website and its visitors, safeguarding data integrity and privacy. Search engines like Google also favor secure websites, giving them a slight edge in rankings. This comprehensive guide will walk you through the process of connecting your custom domain to GitHub Pages and, crucially, enabling HTTPS, ensuring your website is both professional and secure.
The journey to a custom domain and HTTPS on GitHub Pages involves several key steps. We'll begin by acquiring a domain name, if you haven't already, then configure DNS records to point your domain to GitHub's servers. Next, we'll delve into the specifics of setting up your GitHub Pages repository to recognize and use your custom domain. Finally, we’ll tackle the critical step of enabling HTTPS, ensuring your site is secure and trusted by visitors and search engines alike. Whether you're a seasoned developer or just starting out with web hosting, this guide provides clear, actionable instructions to get your website up and running with a custom domain and HTTPS on GitHub Pages.
Why Should You Use a Custom Domain for Your GitHub Pages Site?
While username.github.io URLs are convenient for quick deployments, opting for a custom domain offers significant advantages that can elevate your online presence from a hobby project to a professional platform.
Enhanced Professionalism and Branding
A custom domain immediately makes your website appear more legitimate and established. Instead of a generic GitHub Pages URL, yourname.com or yourbrand.com conveys a sense of seriousness and commitment. This is crucial for personal portfolios, business websites, or any project where you want to build a distinct online identity. A memorable, unique domain name reinforces your brand and makes it easier for people to find and remember your site.
Improved Memorability and Shareability
Think about trying to remember or share a long, hyphenated username.github.io address. It's cumbersome and prone to errors. A short, descriptive custom domain, on the other hand, is easy to recall and share verbally or in print. This simplicity enhances user experience and encourages repeat visits.
Better SEO and Search Engine Visibility
While custom domains don't directly guarantee higher search rankings, they contribute to a more optimized website. A consistent domain name helps search engines understand and index your content more effectively. Furthermore, a professional-looking domain, combined with HTTPS, builds trust with both users and search engine algorithms. Over time, this can lead to improved search engine visibility and organic traffic.
Ownership and Control
When you own a custom domain, you have greater control over your online identity. If you decide to move your hosting from GitHub Pages to another provider in the future, you can simply update your DNS records to point to the new server, retaining your established domain name and avoiding any loss of brand recognition or SEO equity. This portability provides long-term flexibility and security for your web presence.
Why Is HTTPS Essential for Your GitHub Pages Site?
In the past, HTTPS was primarily reserved for websites handling sensitive information like online payments or personal data. Today, it has become an absolute necessity for all websites, regardless of their purpose. Integrating HTTPS with your GitHub Pages site is a straightforward process that yields substantial benefits for both your website and its visitors.
Data Security and Encryption
At its core, HTTPS encrypts the communication between a user's web browser and your server. This means that any data exchanged, whether it's a simple page request or form submission, is protected from eavesdropping and tampering. Without HTTPS, information can be intercepted by malicious actors, potentially leading to data breaches or privacy violations. For a GitHub Pages site, even if you're not handling sensitive user data directly, this encryption prevents anyone from injecting malicious code or advertisements into your site's content as it travels over the network.
Trust and Credibility
Modern web browsers prominently display security indicators. When a website uses HTTPS, users see a padlock icon in the address bar, often accompanied by "Secure" or "https://". Conversely, non-HTTPS sites are frequently flagged as "Not Secure," especially when users are asked to enter any information. This stark warning can deter visitors, erode trust, and make your site appear unprofessional or even dangerous. Establishing trust is crucial for building an audience and encouraging engagement with your content.
SEO Advantages
Search engines, particularly Google, have publicly stated that HTTPS is a ranking signal. While it might be a minor factor individually, neglecting HTTPS can put your site at a disadvantage compared to competitors who have adopted it. Google's push for a more secure web means that sites with HTTPS are favored in search results, potentially leading to better visibility and increased organic traffic. For a static site on GitHub Pages, this can be a significant boost in discoverability.
Compliance and Future-Proofing
As internet security standards evolve, HTTPS is increasingly becoming a baseline requirement. Many new web technologies and browser features are only available to secure contexts. By implementing HTTPS now, you future-proof your website, ensuring it remains compatible with the latest web standards and provides the best possible experience for your users. Furthermore, some third-party services or APIs might require your website to be served over HTTPS for integration.
Choosing and Registering a Custom Domain Name
Before you can point a custom domain to your GitHub Pages site, you need to own one. If you already have a domain name, you can skip this section and proceed to DNS configuration. However, if you're starting from scratch, here's what you need to consider when choosing and registering your domain.
Tips for Choosing a Domain Name
- Keep it Short and Memorable: Shorter domains are easier to type, remember, and share. Avoid overly long or complex names.
- Make it Relevant: Your domain name should ideally reflect your name, brand, or the content of your website. This helps users understand what your site is about at a glance.
- Avoid Hyphens and Numbers: While sometimes necessary, hyphens and numbers can make a domain name harder to communicate verbally and more prone to typos.
- Consider Top-Level Domains (TLDs): The most common TLD is .com, and it's generally recommended due to its widespread recognition and trust. However, don't shy away from other relevant TLDs like .net, .org, or country-specific TLDs like .co.id if they better suit your purpose and target audience. Newer generic TLDs (gTLDs) like .blog, .io, or .tech can also be excellent choices, especially if a good .com is unavailable.
- Check for Availability: The domain name you want might already be taken. You'll need to use a domain registrar's search tool to check its availability.
How to Register a Domain Name
Registering a domain name is a straightforward process handled by domain registrars. These are companies accredited to reserve and assign domain names. Here's a general outline of the steps:
- Choose a Domain Registrar: Popular domain registrars include GoDaddy, Namecheap, Google Domains, Cloudflare Registrar, and many more. Research different registrars to compare pricing, features (like free WHOIS privacy), and customer support.
- Search for Your Desired Domain: On the registrar's website, use their search tool to check if your chosen domain name is available. If it is, great! If not, the registrar will usually suggest alternatives.
- Add to Cart and Proceed to Checkout: Once you've found an available domain, add it to your cart. You'll typically register the domain for a specific period, usually one year, with options to extend for longer terms.
- Provide Registration Information: You'll be asked to provide your contact information (name, address, email, phone number). This information is generally publicly available via WHOIS lookup, but many registrars offer WHOIS privacy protection (sometimes for an additional fee, sometimes free) which replaces your details with the registrar's, protecting your privacy. It's highly recommended to enable this.
- Complete Payment: Follow the prompts to complete your purchase.
- Verify Your Email: After registration, you'll usually receive an email requesting you to verify your contact information. This is a crucial step and often required by ICANN (the governing body for domain names) to activate your domain. Make sure to complete this verification.
Once your domain is registered and verified, you'll have access to its DNS settings through your registrar's control panel. This is where you'll configure the necessary records to point your domain to GitHub Pages.
Configuring DNS Records to Point to GitHub Pages
The Domain Name System (DNS) is like the internet's phonebook. When someone types your domain name (e.g., yourbrand.com) into their browser, DNS translates that human-readable name into an IP address (e.g., 185.199.108.153), which is the actual location of your website's server. To connect your custom domain to GitHub Pages, you need to create specific DNS records with your domain registrar or DNS hosting provider.
There are two primary types of DNS records you'll typically use for GitHub Pages: A records and CNAME records.
Understanding A Records and CNAME Records
- A Record (Address Record): An A record maps a domain name directly to an IPv4 address. You'll use A records to point your naked domain (e.g., yourbrand.com) to GitHub Pages' IP addresses.
- CNAME Record (Canonical Name Record): A CNAME record maps an alias domain name to another canonical domain name. You'll use a CNAME record for subdomains (e.g., www.yourbrand.com) to point to your GitHub Pages username.github.io URL.
GitHub Pages IP Addresses
For your naked domain to resolve to GitHub Pages, you need to point it to GitHub's specific IP addresses. As of my last update, GitHub Pages uses the following IP addresses:
185.199.108.153
185.199.109.153
185.199.110.153
185.199.111.153
It's always a good practice to check the official GitHub documentation for the most up-to-date IP addresses, as they can occasionally change.
Steps to Configure DNS Records
The exact interface for configuring DNS records varies slightly between domain registrars (e.g., GoDaddy, Namecheap, Google Domains). However, the general steps remain the same:
- Log in to Your Domain Registrar's Account: Access the control panel or dashboard where you manage your domain names.
- Navigate to DNS Management: Look for sections like "DNS Management," "Advanced DNS," "Domain Settings," or similar.
-
Add A Records for Your Apex/Naked Domain:
- For your apex domain (e.g., yourbrand.com without www), you need to create four A records.
-
For each A record:
- Type: A
- Host/Name: @ or leave it blank (this signifies the root domain)
- Value/Points to: Enter one of GitHub's IP addresses (e.g., 185.199.108.153)
- TTL (Time To Live): You can usually leave this at the default value (often 3600 seconds or 1 hour). A shorter TTL (e.g., 300 seconds) can speed up DNS propagation if you anticipate making frequent changes, but a longer one reduces the load on DNS servers.
- Repeat this for all four GitHub Pages IP addresses.
-
Add a CNAME Record for the www Subdomain (Recommended):
- It's highly recommended to also set up a www subdomain (e.g., www.yourbrand.com) to point to your GitHub Pages site. This ensures that users who type www before your domain name still reach your site.
- Type: CNAME
- Host/Name: www
- Value/Points to: Your GitHub Pages default domain (e.g., username.github.io)
- TTL: Default value.
- Save Changes: After adding or modifying the records, make sure to save your changes.
| Type | Host/Name | Value/Points to | TTL |
|---|---|---|---|
| A | @ | 185.199.108.153 | 3600 |
| A | @ | 185.199.109.153 | 3600 |
| A | @ | 185.199.110.153 | 3600 |
| A | @ | 185.199.111.153 | 3600 |
| CNAME | www | username.github.io |
3600 |
DNS Propagation Time
After saving your DNS changes, it takes some time for these changes to propagate across the internet. This process, known as DNS propagation, can take anywhere from a few minutes to up to 48 hours, though it's usually much quicker. During this time, some users might still see your old site (if you had one) or a "site not found" error, while others might see your new GitHub Pages site. You can use online tools like DNS Checker to monitor the propagation status of your domain.
Setting Up Your GitHub Pages Repository
Once your DNS records are configured, the next crucial step is to tell your GitHub Pages repository that it should respond to your custom domain. This involves adding a special file called CNAME (note: no file extension) to the root of your repository.
Creating the CNAME File
The CNAME file is a plain text file that contains your custom domain name. GitHub Pages uses this file to understand which custom domain it should serve content for. Here’s how to create and add it:
- Navigate to Your Repository: Go to the main page of your GitHub Pages repository on GitHub.com (e.g., github.com/username/repository-name).
-
Create a New File:
- Click on the "Add file" dropdown.
- Select "Create new file."
- Name the File CNAME: In the "Name your file..." field, type CNAME (all uppercase, no file extension).
-
Add Your Custom Domain: In the file content area, type your custom domain name.
- If you primarily want your site to be accessible via www.yourbrand.com, then type www.yourbrand.com.
- If you prefer yourbrand.com (the naked domain), then type yourbrand.com.
Important: Only enter one domain name. GitHub Pages will handle the redirection from the other (e.g., if you specify yourbrand.com, it will redirect www.yourbrand.com to yourbrand.com if configured correctly in DNS, and vice versa).
- Commit the New File: Add a commit message (e.g., "Add CNAME file for custom domain") and click "Commit new file."
Alternatively, if you manage your repository locally, you can create the CNAME file in your project's root directory and then push it to your GitHub repository:
echo "yourbrand.com" > CNAME
git add CNAME
git commit -m "Add CNAME file"
git push origin main
Configuring GitHub Pages Settings
After committing the CNAME file, you should verify and configure the custom domain within your repository's settings:
- Go to Repository Settings: On your repository page, click on the "Settings" tab.
- Navigate to Pages: In the left sidebar, click on "Pages" (under the "Code and automation" section).
- Verify Custom Domain: Under the "Custom domain" section, you should now see your custom domain listed. GitHub will automatically detect the CNAME file.
- Enforce HTTPS (Crucial Step for Security): Below the custom domain field, you'll see a checkbox labeled "Enforce HTTPS." Check this box. GitHub will then automatically provision a free SSL certificate for your custom domain and handle all the necessary redirects to ensure your site is served over HTTPS. This process can take a few minutes to an hour after your DNS records have fully propagated.
If the custom domain isn't recognized immediately, or if the "Enforce HTTPS" option is grayed out, it usually means that the DNS propagation is still in progress, or there's an issue with your DNS records. Double-check your DNS configuration with your domain registrar and ensure the CNAME file is correctly placed in your repository's root.
Once these steps are completed, and DNS has fully propagated, your GitHub Pages site should now be accessible via your custom domain with HTTPS enabled. It’s important to test both the www version and the naked domain (e.g., www.yourbrand.com and yourbrand.com) to ensure they both resolve correctly and redirect to the preferred version with HTTPS.
Troubleshooting Common Issues
While setting up a custom domain and HTTPS on GitHub Pages is generally straightforward, you might encounter a few common issues. Here’s how to diagnose and resolve them:
1. Domain Not Resolving or Showing "Site Not Found"
-
DNS Propagation: This is the most frequent cause. DNS changes take time to update across the internet.
- Solution: Wait patiently, typically a few hours (up to 48 hours in rare cases). Use online DNS checkers (like dnschecker.org or whatsmydns.net) to verify if your A records and CNAME record are pointing correctly to GitHub's IPs and your username.github.io respectively from various locations.
-
Incorrect DNS Records: A typo or incorrect value in your A or CNAME records will prevent your domain from resolving.
- Solution: Double-check your A records to ensure they point to all four GitHub Pages IP addresses and that your CNAME record for www (if used) points to username.github.io. Ensure the "Host/Name" fields are correctly configured (e.g., @ or blank for apex domain, www for www subdomain).
-
Missing or Incorrect CNAME File in Repository: If the CNAME file is missing, misnamed, or contains an incorrect domain, GitHub Pages won't know to serve your custom domain.
- Solution: Verify that a file named exactly CNAME (all caps, no extension) exists in the root of your GitHub Pages repository. Ensure it contains only your desired custom domain (e.g., yourbrand.com or www.yourbrand.com), with no extra spaces or characters.
-
Incorrect Repository Branch for Pages: If you're using a specific branch for GitHub Pages (e.g., gh-pages branch instead of main), ensure your settings reflect this.
- Solution: In your repository settings under "Pages," confirm that the correct branch is selected as the source for GitHub Pages.
2. "Enforce HTTPS" Option Grayed Out or Not Working
-
DNS Not Fully Propagated: GitHub needs to verify your domain's DNS records before it can provision the SSL certificate.
- Solution: Wait for DNS propagation to complete. This is the most common reason. Keep checking the "Enforce HTTPS" checkbox in your GitHub Pages settings; it should become active once the DNS is correctly pointing to GitHub.
-
Missing CNAME File: As with domain resolution, the CNAME file is essential for GitHub to know which domain to issue an SSL certificate for.
- Solution: Ensure your CNAME file is present and correctly configured in your repository.
-
Apex Domain vs. www Subdomain Mismatch: Sometimes issues arise if you're trying to enforce HTTPS on an apex domain (yourbrand.com) but your DNS or CNAME file is primarily configured for the www subdomain, or vice versa.
- Solution: Ensure consistency. If you want yourbrand.com to be the primary, make sure your A records are solid and your CNAME file reflects yourbrand.com. GitHub Pages will automatically handle redirects from www to your apex domain if both are configured in DNS.
-
Previous DNS Configuration Conflict: If you previously used another service with your domain, old DNS records (especially AAAA records for IPv6) could be causing conflicts.
- Solution: Review all DNS records for your domain with your registrar and remove any AAAA records or other conflicting records that are not necessary for GitHub Pages.
3. Content Not Updating After Push
-
Build Issues (for Jekyll/Static Site Generators): If your site uses Jekyll or another static site generator, a build error can prevent new content from appearing.
- Solution: Check the "Actions" tab in your GitHub repository. Look for recent workflow runs related to Pages deployment. If there's a failed build, review the logs for error messages. Common issues include Jekyll version conflicts, missing dependencies, or syntax errors in your content.
-
Browser Cache: Your browser might be serving an old version of your site from its cache.
- Solution: Perform a hard refresh (Ctrl+F5 or Cmd+Shift+R) or clear your browser's cache. Try accessing the site in incognito/private mode to bypass the cache entirely.
-
CDN Cache (if applicable): If you're using a CDN service (like Cloudflare) in front of GitHub Pages, its cache might need to be purged.
- Solution: Log into your CDN provider's dashboard and look for an option to "Purge Cache" or "Clear Cache" for your domain.
By systematically checking these common issues and their solutions, you can efficiently troubleshoot most problems encountered when setting up custom domains and HTTPS for your GitHub Pages site. Patience and careful verification of each step are key.
Maintaining Your GitHub Pages Site with a Custom Domain
Once your GitHub Pages site is live with its custom domain and HTTPS, ongoing maintenance is minimal but important. Here are some key considerations to ensure your site remains accessible, secure, and up-to-date.
Domain Name Renewal
Your domain name registration is not permanent; it's typically purchased for a specific period (e.g., one year, five years). Neglecting to renew your domain name will lead to your website becoming inaccessible. Most domain registrars offer automatic renewal options and send out multiple reminders before expiration. Make sure your contact information with your registrar is up-to-date so you receive these notifications.
- Action: Set up auto-renewal with your domain registrar and ensure your payment method is current. Periodically check your registrar's dashboard to confirm your domain's expiration date.
Monitoring DNS Records
While DNS records are generally stable, it's good practice to occasionally verify that they are still correctly pointing to GitHub Pages. This is particularly relevant if you make changes to your domain's DNS settings for other services (e.g., email hosting) or if you switch DNS providers.
- Action: Use an online DNS checker tool once every few months to confirm your A records point to GitHub's IPs and your CNAME for www points to username.github.io.
Keeping Your Repository Secure and Clean
Although GitHub Pages hosts static content, your repository itself should be kept tidy and secure. This includes:
- Regularly Commit and Push Changes: Maintain good version control practices.
- Review Dependencies: If you're using Jekyll or other static site generators, keep your dependencies (e.g., gems for Jekyll) updated to avoid security vulnerabilities or build errors.
- Avoid Sensitive Information: Never commit API keys, personal identifiable information, or other sensitive data directly into your public repository, even if it's not displayed on your live site.
HTTPS Certificate Renewal (Automated by GitHub)
One of the significant advantages of using GitHub Pages for HTTPS is that GitHub automatically provisions and renews the SSL certificate for your custom domain. You typically don't need to do anything manually.
- Action: Occasionally check the "Enforce HTTPS" checkbox in your GitHub Pages settings to ensure it remains enabled. If your site suddenly shows security warnings, re-verify your DNS and the HTTPS setting.
Content Updates and SEO
An evergreen article implies continuous relevance. This means your content should be updated occasionally. Regularly updating your content and ensuring your site is performing well helps maintain its relevance and search engine ranking. Consider these points:
- Regular Content Updates: Keep your blog posts, portfolio, or documentation fresh. New content signals to search engines that your site is active and relevant.
- Optimize for SEO: While beyond the scope of this guide, remember basic SEO principles: use descriptive titles, meta descriptions, alt text for images, and internal linking.
- Monitor Site Performance: Tools like Google Analytics or Google Search Console can help you track traffic, user behavior, and identify any crawl errors or performance issues.
Handling Domain Changes or Migrations
Should you decide to change your custom domain or migrate your site away from GitHub Pages, plan carefully:
- Changing Domain: Update your CNAME file in the repository and your DNS records with your registrar to reflect the new domain.
- Migrating Away: Remove the CNAME file from your GitHub repository. Update your DNS records with your registrar to point to your new hosting provider's IP addresses or CNAME.
By keeping these maintenance points in mind, your GitHub Pages site with a custom domain and HTTPS can serve as a robust, professional, and secure online presence for years to come.